Saturday, August 3, 2013

Artist Spotlight: Joe Garber

Photo by Jihee Kim

Hey Crafters,

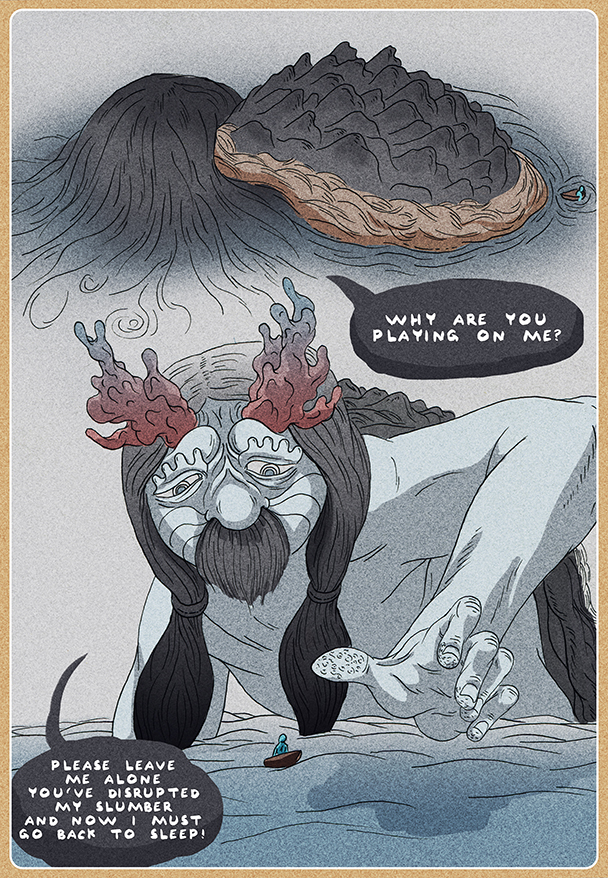
The Odyssey of BlueBoy is an online weekly comic drawn to wake up the creative process. The illustrator, Joe Garber, takes suggestions of what next week's adventure is about. I made a submission and it became Week 8!

The Odyssey of BlueBoy was recommended to me by Artist Spotlighted friend Andy Musser.


When did you decide that illustration was how to wanted to make your way in the world?
I think I'm still deciding that, haha. It seems like every day I have to question and weigh the pros and cons. An ex-boyfriend told me once that I was like a sheet in front of a storm. That stayed with me probably because it's at least partly true. Illustration-type things is what I seem to keep coming back to. I wouldn't say I really chose it, but that seems like such a canned-answer. I've been drawing forever, which is also a canned-answer, but I just think that there's something about drawing for me, that specific way to express my thoughts and ideas, that I just find really exciting every time I do it. So it wasn't really a choice just a part of life that really excites me, I've definitely put a ton of work into it, too. I also animate as a day-job.

Tell us about your process, please.
My process seems to always be changing, but the base is always a strong idea. An idea that really resonates with me to my core, when you have that nothing else really matters, even if the art turns out a little wonky you still have that idea in your head of what you meant it to be, an idea that resonates with you. I always come back to objective and subjective as two basic forces in life. When I see a canvas in a coffee-shop somewhere that a person has carelessly splattered paint onto it seems like that would be an enjoyable experience for the painter, but the objective experience of looking at a piece like that is probably not going to be so good. And on the other end of the spectrum you might have some amazingly beautiful photo-real rendering of a vase of flowers, which looks like it might not have been so fun to make, but it still dazzles your eye. The first one has too much emotion and is to subjective, too sloppy, and the second has too much technique and is too objective and it doesn't stay with you or resonate. Beauty is found in a balance and balance is my goal. Not that these people should stop spraying canvases with paint or doing photo-realistic drawings of their converses, people need to express themselves in whatever way comes to them as an individual; that's the only way they are going to use their full potential or progress in a way that is exciting for them. But if you were asking about physical process I usually like to use ink on paper and then Photoshop to color things. Lately I've been doing gouache paints, too!

What do you like to snack on when you work?
I'm vegan so anything that doesn't have animal products. Lately I've gone a little too crazy over Jo-Jos. My friends might say that my favorite food group is calories. Pan-fried PB&Js! Oh my gawd, those are super good.

How do you break through creative blocks?
I think the best way to break creative blocks is to use them. Try to dig deep, find the feeling that's stopping you and incorporate it into the work. I find myself thinking things like "Oh my god, no one is going to like this (random thing I'm creating)" and I try to find the core of that feeling, like the fear of not being accepted, and I try to bring some of that into the work. I think that if a creative block does completely stop you from being able to work it's important to find what that core is and if you still can't get past it then you need to examine your intentions. When you have good intentions with a piece, you can't really go wrong. There's good and then there's great.

What is your proudest achievement so far?
My proudest achievement is that I have become a person who wants to do this kind of work. A person who still has hope enough in life to value what I'm doing. As in The Odyssey of Blue Boy, the hopeless still haven't captured me, haha! They have come close though! Too real? Maybe. The non-heady answer, though, would probably be the most recent thing I've done which, right now is cartoon I'm about to release, it's called Home Town. Check my website for it soon!


Please check out Joe on his website, at The Odyessy of Blue Boy and Joe's new cartoon Home Town!

BK

Wednesday, July 31, 2013

Tutorial: Paper Beads

Hey Paper Crafters,
I recently made a metric ton of paper beads for a project out of magazine pages. I was laid up for a week after injuring most everything under my knees and I needed something to keep my hands busy. I also watched a metric ton of Sabrina, the Teenage Witch (every season now on Hulu; you're welcome).

Making paper beads is extremely easy and the beads are surprisingly sturdy. When I was young I had a cheap-o plastic machine to help roll the beads up but as an adult I don't have room that for that kind of junk so I used a drink stirrer to help curl the paper and hand rolled the beads. It felt like a joint rolling intensive.

Supplies:
  • Scrap Paper, fashion magazines and National Geographic tends to be a great place for colorful, low text images but sheet music or scrap booking paper would be nice too.
  • Scissors
  • Stick glue
  • Something long and round; drink stirrer, pencil, chop stick
Directions:
  1. Grab your paper and cut long triangle shapes. No need to make them exact. I just ripped out magazine pages and cut about 6-8 strips.
  2. Curl around the stirrer starting with the wide end of the paper to make curly.
  3. Swipe glue along wide end to start and add when needed, especially at the end to finish.
*You could do your gluing around the stirrer but I found free rolling worked better for me.

Uses for paper beads include children's crafts like stringing beads for jewelry and gluing to frames in place of pasta noodles or stringing them for garlands for parties and Christmas trees (try spraying the garlands with glitter for festive shimmer) or making paper chandeliers (which is why I made mine, stay tuned for those).

Have fun!
BK

Thursday, June 20, 2013

Ladies Craft Night: Sky Lanterns-Part Two

Hey Pyromaniacs,

After our first attempt at Sky Lanterns went south I had to figure out a way to use the rest of the Sky Lanterns we had bought. I reasoned that if we add a length of yarn to the circular frame of the lantern, we could make them into kites so we could keep better control of the lantern's distance and clean up after ourselves.

I was in a bit of a pre-moving time crunch so we picked a slightly windy day to try this theory out. Remember, when trying Sky Lanterns pick a day with little to no wind. My theory proved right! We were worried about the string being a fire hazard but it was safe and no more a fire hazard than lighting a paper lantern on fire in the first place.

Like a kite, it was easy to handle and much more satisfying since we could control the height and enjoy the full length of the life of a floating Sky Lantern. If you try this, wrap your string around a book or into a ball. If it is just a pile of string it will get tangled and you'll loose the max length of string/height of the lantern.

I still don't recommend the purchase of Sky Lanterns but if you just have to try it for yourself, keep an eye out for a deal and happy floating!

BK

Monday, May 20, 2013

Ladies Craft Night: Sky Lantern Fail

Hey Pie in the Sky Eyed Crafters,

Ladies Craft Night had an interesting trial run working with Sky Lanterns. I think every young woman thinks these brightly glowing, floating, paper lanterns are super magical and idyllic. The Ladies and I found them to be the EXACT opposite.

I found a Groupon that made ten Sky Lanterns $25 plus S&H (about $8). It is one of our more expensive crafts but we all wanted to take a crack at floating one of these babies in the night sky. When they arrived we decided to wait out dusk on a picnic blanket in the park and snack and chat. I picked an evening with little to no wind and a park with a lake thinking that the lanterns would be less of a fire hazard in case they floated into the lake.

We decided, after realizing we had many unanswered questions, that we would send up a single test lantern.  Not knowing how far away our lantern would go, how fast it would travel, how long it would burn we decided to follow it so we could pick up the wire frame (the paper would biodegrade but not that frame) and make sure we weren't setting our neighborhood on fire.

The first thing we realized is that this lantern is made of paper and if we're not careful, we could light the whole kit and caboodle on fire. I held the small wire frame, another held the paper part upright, and a third lady lit the fuel pack provided with the lantern.

The bag they come in says Sky Lanterns can go up to 3,000 feet and we wondered whether that was horizontal or vertical. We soon learn that it is horizontal. This paper bag can move! After about 7 seconds of Ooo-ing, we realize that it was on the move and immediately split into two teams, one on foot and one in a vehicle.

In the end we lost that darned Sky Lantern. We haven't the foggiest where the frame ended up but I believe that the fuel pack dies, then the lantern just floats to the ground with no danger of setting anything on fire.


This is a BK's Craft Blog first: A video! This video shows our first and only attempt at launching a Sky Lantern. You can see just how quickly our joy turns to safety awareness. Right after the video stops, we immediately split into teams to track the lantern.

This week we are trying a modified version of the Sky Lantern (since we had 9 left!) by tying a length of yarn to the wire frame so we can control their height making them...FIRE KITES! Stay tuned for Part 2 for the exciting conclusion of Sky Lanterns!

BK


Friday, May 10, 2013

Ladies Craft Night: Chicago Edition

Hey Craftnight Oilers,

During a recent trip to Chicago to visit friends I hosted a Ladies Craft Night complete with hot tea, red wine and cupcakes. Although I cannot take credit for inspiring the edibles (thanks, Liz), I have been eyeing these henna patterned jars from LITdecor and thought we could grab a jar from the recycling and a tube of puff paint and go to town!

Boy I'll tell you, it took a lot more patience than I had anticipated. The slow lines take a steady hand and a keen eye to keep the designs balanced. We got creative looking for places to hold our jar while you paint. And have a doodle drawn out on paper to guide you before you start so you're not wasting any time thinking of your design. As for the wire hanger, try a 22 gauge wire and pliers, once around the neck and one half circle for the hanger.


 BK

PS While at the Michael's we found these totally cute cards designed after patterns in the dollar sections ($1.50-ish for six) The clincher are the envelopes covered in the tissue pattern's shapes. We saw three different sets which I immediately bought. LIKE I NEED MORE STATIONARY!


Monday, May 6, 2013

Artist Spotlight: Andy Musser

Photo by Jen and Chris Creed
Hey Friends!

I want to introduce you to a great artist and friend, Andy Musser. His whimsical style easily translates into illustration. Andy has done animation work for Yahoo, Microsoft and Xbox Live through Run Studios. He has even written his own children's book. In his free time plays the ukulele and has recorded an EP with his sister, Amy, who is a children's librarian and a friend of this blog.


This holiday season, I asked Andy if he had time between creating and showing his own work to do a little custom work for me and, boy, did he ever come through! I was lucky and very proud to present a really great piece of work to my fella for Valentine's Day of characters based on our nicknames for each other.

One of Andy's artist cards sits to the left of my gift
When did you decide that illustration was how to wanted to make your way in the world?
When I was growing up I drew a lot and was always building something crafty. I drew a lot of comics, made puppet shows, and wore sweat pants all the time; so not much has changed. My parents were very supportive of all my endeavors and made sure I always had a supply of paper, cardboard, toilet paper rolls...whatever I needed. In my teens, I started to get into computer animation and decided that is what I wanted to study in college. But once I was in school, I realized what interested me the most about animated films was the story and the pre-production art. When I boiled it down, I essentially wanted to make picture books. My school had an illustration program that allowed me to emphasize in Children's Book Illustration, so I really lucked out.

Tell us about your process, please.
My process varies from project to project, but I always start the same way. Since illustration is all about communicating an idea, I spend a lot of time thinking about what I'm trying to communicate and how to simplify it. Then I sketch as much as I can while imagining the most interesting way to show the idea. Research is essential and I try to view/experience as much as time will allow so that I can really understand my subject matter. Once I get a good idea of where I'm going with the project, I usually do several thumbnail sketches. From those thumbnails, I'll pick one and do a final sketch. In-between, I'll do a lot of little sketches to figure out how to draw elements and characters. When I'm painting, I always do small color sketches to quickly brainstorm good combinations. If I've done all this preliminary work right, then the final illustration gets completed relatively quickly. Since I've already made all the hard decisions, it's more a matter of putting the paint down and putting in the details. 

What is your favorite part of a project?
Because I'm a very lazy person, I'd have to say the very beginning and the very end. At the beginning, it's fun because there aren't any constraints yet and I get to daydream and draw all sorts of crazy ideas. The very end is fun because all the hard work has been done and I can just focus on making the final illustration. 

What do you like to snack on when you work?
Oh man, I love to snack when I work! Right now, I'm really into tea and brownies, it's the best combo!

What is your proudest achievement so far?
The other day some kids asked me to draw a cyclops pig-boy! I'm pretty proud of that.

How do you break through creative blocks?
Usually by taking breaks and doing something completely different. That can be the hardest thing to do, especially on a deadline, but I've learned that you can't break a creative block by beating your head against it. Also, having a hobby, job, or regular activity that gives me inspiration and new ideas is really important.

What are you working now?
As a personal project, I'm working a wordless picture book. It's about a boy waiting for a seed to grow and the magical characters that visit his garden at night. I'm really excited about it and I'm looking for the best way to share it with people. 

I've also started volunteering at the 826 Greenwood Space Travel SupplyCo., a really cool non-profit writing and tutoring center for kids 6-18. I've been helping with this program where a classroom of kids get to write a short children's book together. I'm part of a big crew of volunteers, some days I work as the illustrator and I draw whatever kooky ideas the kids come up with. That is where I drew the cyclops pig-boy. The kids were asked to come up with characters and one boy just threw that down. It was awesome! I also help them write their endings and draw illustrations. It's so great to get to talk with kids about time traveling dinosaurs and cyclops pig-boys. They come up with the best ideas. 

If you live in the Seattle area, go see his current show at Monster Art and Clothing, like him on Facebook, join him on Google, and follow him on his blog!

BK


Sunday, May 5, 2013

Cinco de Mayo

Hey Costumed Crafters,

For Cinco de Mayo why don't you take a look at my tutorial to make your own Flower Headband. I know I'll be dusting off this festive head wear for the day!

BK